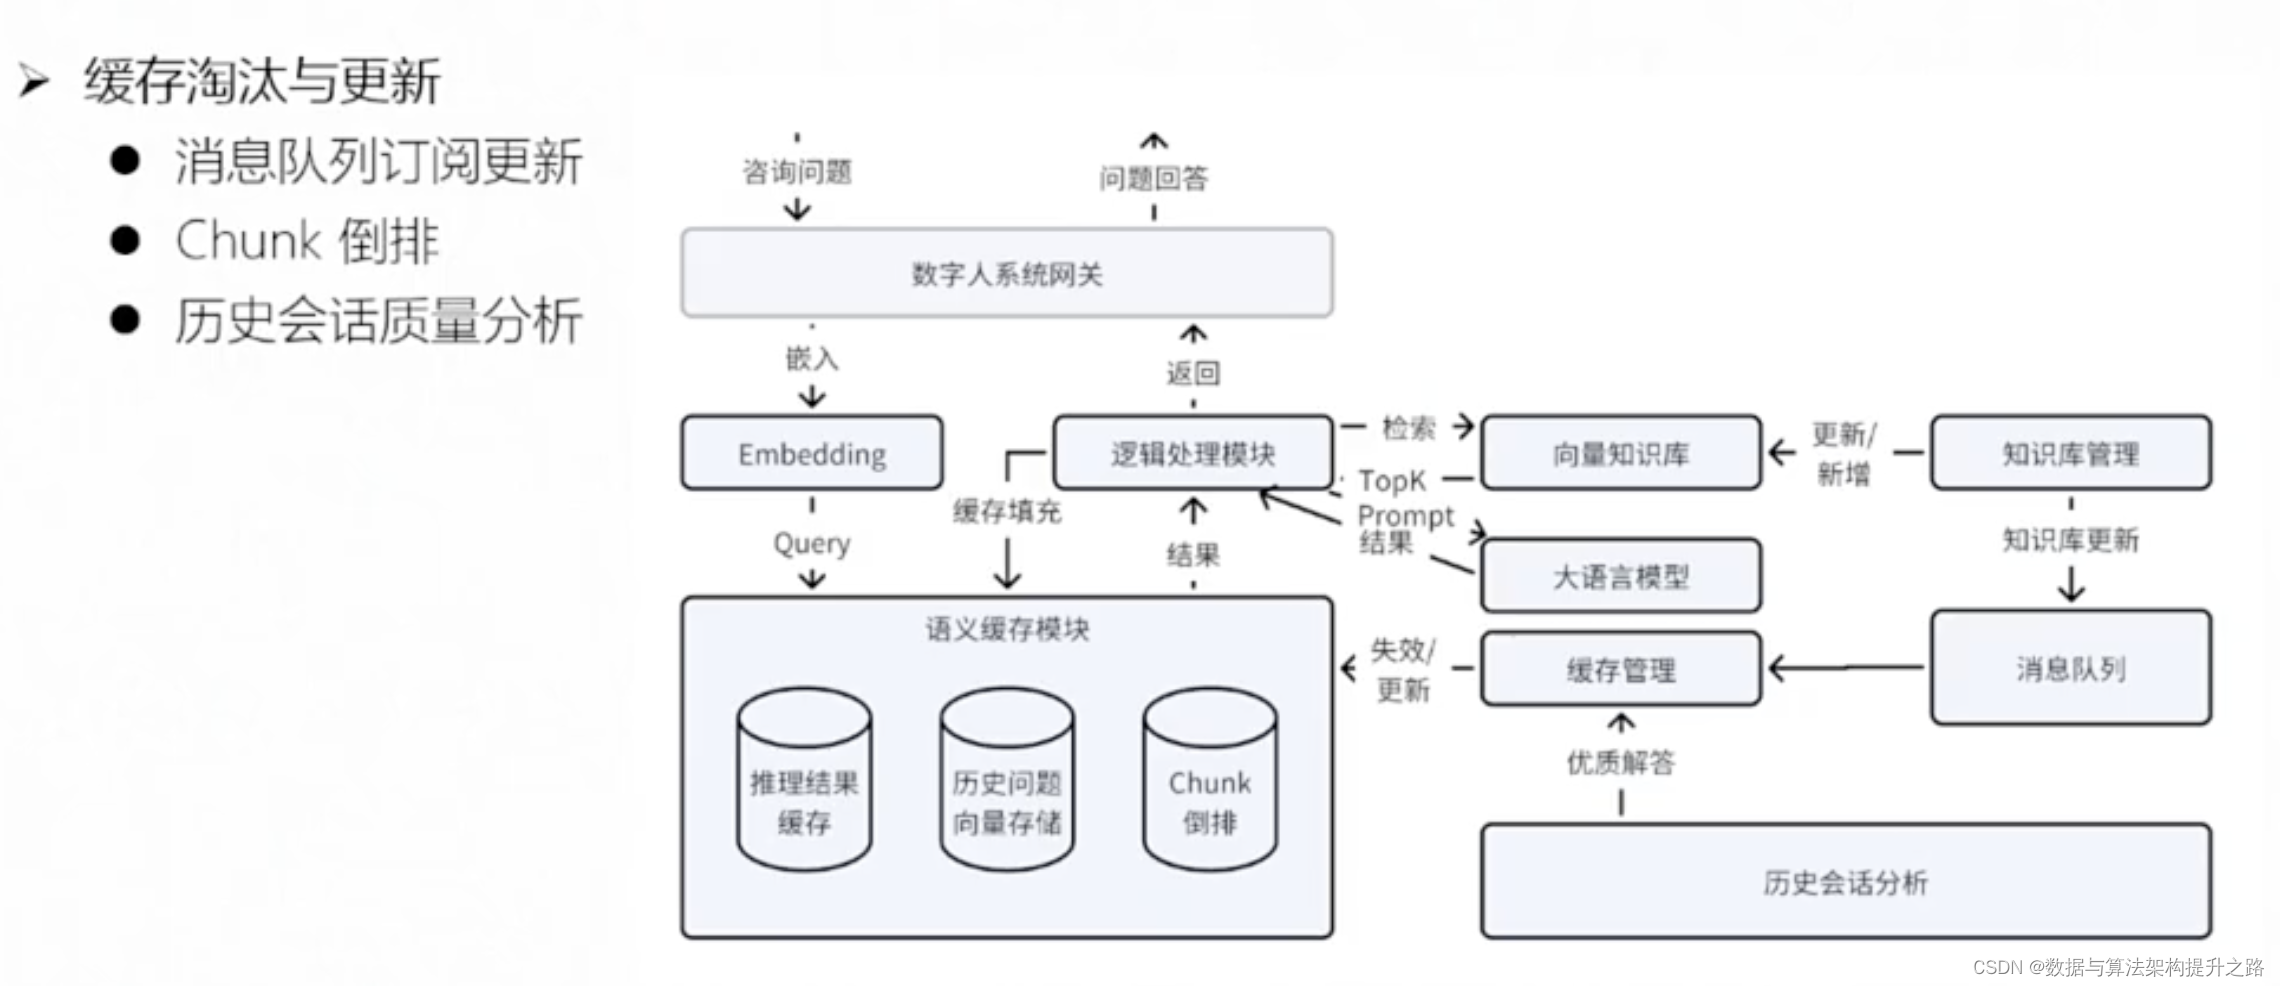
1,认识层级树
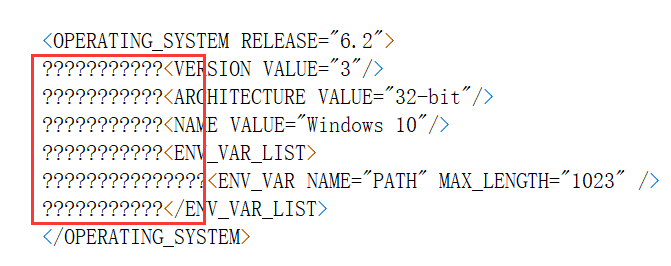
可以通过dumpsys activity containers 看到 WMS 层级树的结构
ACTIVITY MANAGER CONTAINERS (dumpsys activity containers)
ROOT type=undefined mode=fullscreen override-mode=undefined requested-bounds=[0,0][0,0] bounds=[0,0][1440,2960]
  #0 Display 0 name="Built-in Screen" type=undefined mode=fullscreen override-mode=fullscreen requested-bounds=[0,0][1440,2960] bounds=[0,0][1440,2960]
   #2 Leaf:36:36 type=undefined mode=fullscreen override-mode=undefined requested-bounds=[0,0][0,0] bounds=[0,0][1440,2960]
    #1 WindowToken{6cc524e type=2024 android.os.BinderProxy@8ffb949} type=undefined mode=fullscreen override-mode=undefined requested-bounds=[0,0][0,0] bounds=[0,0][1440,2960]
     #0 888c47c ScreenDecorOverlayBottom type=undefined mode=fullscreen override-mode=undefined requested-bounds=[0,0][0,0] bounds=[0,0][1440,2960]
    #0 WindowToken{4346895 type=2024 android.os.BinderProxy@ad2b04c} type=undefined mode=fullscreen override-mode=undefined requested-bounds=[0,0][0,0] bounds=[0,0][1440,2960]
     #0 da08538 ScreenDecorOverlay type=undefined mode=fullscreen override-mode=undefined requested-bounds=[0,0][0,0] bounds=[0,0][1440,2960]
   #1 HideDisplayCutout:32:35 type=undefined mode=fullscreen override-mode=undefined requested-bounds=[0,0][0,0] bounds=[0,0][1440,2960]
    #2 OneHanded:34:35 type=undefined mode=fullscreen override-mode=undefined requested-bounds=[0,0][0,0] bounds=[0,0][1440,2960]
     #0 FullscreenMagnification:34:35 type=undefined mode=fullscreen override-mode=undefined requested-bounds=[0,0][0,0] bounds=[0,0][1440,2960]
      #0 Leaf:34:35 type=undefined mode=fullscreen override-mode=undefined requested-bounds=[0,0][0,0] bounds=[0,0][1440,2960]
    #1 FullscreenMagnification:33:33 type=undefined mode=fullscreen override-mode=undefined requested-bounds=[0,0][0,0] bounds=[0,0][1440,2960]
     #0 Leaf:33:33 type=undefined mode=fullscreen override-mode=undefined requested-bounds=[0,0][0,0] bounds=[0,0][1440,2960]
    #0 OneHanded:32:32 type=undefined mode=fullscreen override-mode=undefined requested-bounds=[0,0][0,0] bounds=[0,0][1440,2960]
     #0 Leaf:32:32 type=undefined mode=fullscreen override-mode=undefined requested-bounds=[0,0][0,0] bounds=[0,0][1440,2960]
   #0 WindowedMagnification:0:31 type=undefined mode=fullscreen override-mode=undefined requested-bounds=[0,0][0,0] bounds=[0,0][1440,2960]
    #6 HideDisplayCutout:26:31 type=undefined mode=fullscreen override-mode=undefined requested-bounds=[0,0][0,0] bounds=[0,0][1440,2960]
     #0 OneHanded:26:31 type=undefined mode=fullscreen override-mode=undefined requested-bounds=[0,0][0,0] bounds=[0,0][1440,2960]
      #2 FullscreenMagnification:29:31 type=undefined mode=fullscreen override-mode=undefined requested-bounds=[0,0][0,0] bounds=[0,0][1440,2960]
       #0 Leaf:29:31 type=undefined mode=fullscreen override-mode=undefined requested-bounds=[0,0][0,0] bounds=[0,0][1440,2960]
      #1 Leaf:28:28 type=undefined mode=fullscreen override-mode=undefined requested-bounds=[0,0][0,0] bounds=[0,0][1440,2960]
      #0 FullscreenMagnification:26:27 type=undefined mode=fullscreen override-mode=undefined requested-bounds=[0,0][0,0] bounds=[0,0][1440,2960]
       #0 Leaf:26:27 type=undefined mode=fullscreen override-mode=undefined requested-bounds=[0,0][0,0] bounds=[0,0][1440,2960]
    #5 Leaf:24:25 type=undefined mode=fullscreen override-mode=undefined requested-bounds=[0,0][0,0] bounds=[0,0][1440,2960]
     #1 WindowToken{914ccc0 type=2024 android.os.BinderProxy@60ae43} type=undefined mode=fullscreen override-mode=undefined requested-bounds=[0,0][0,0] bounds=[0,0][1440,2960]
      #0 20f913e pip-dismiss-overlay type=undefined mode=fullscreen override-mode=undefined requested-bounds=[0,0][0,0] bounds=[0,0][1440,2960]
     #0 WindowToken{4af2b8f type=2019 android.os.BinderProxy@d5bc069} type=undefined mode=fullscreen override-mode=undefined requested-bounds=[0,0][0,0] bounds=[0,0][1440,2960]
      #0 e66fa25 NavigationBar0 type=undefined mode=fullscreen override-mode=undefined requested-bounds=[0,0][0,0] bounds=[0,0][1440,2960]
    #4 HideDisplayCutout:18:23 type=undefined mode=fullscreen override-mode=undefined requested-bounds=[0,0][0,0] bounds=[0,0][1440,2960]
     #0 OneHanded:18:23 type=undefined mode=fullscreen override-mode=undefined requested-bounds=[0,0][0,0] bounds=[0,0][1440,2960]
      #0 FullscreenMagnification:18:23 type=undefined mode=fullscreen override-mode=undefined requested-bounds=[0,0][0,0] bounds=[0,0][1440,2960]
       #0 Leaf:18:23 type=undefined mode=fullscreen override-mode=undefined requested-bounds=[0,0][0,0] bounds=[0,0][1440,2960]
    #3 OneHanded:17:17 type=undefined mode=fullscreen override-mode=undefined requested-bounds=[0,0][0,0] bounds=[0,0][1440,2960]
     #0 FullscreenMagnification:17:17 type=undefined mode=fullscreen override-mode=undefined requested-bounds=[0,0][0,0] bounds=[0,0][1440,2960]
      #0 Leaf:17:17 type=undefined mode=fullscreen override-mode=undefined requested-bounds=[0,0][0,0] bounds=[0,0][1440,2960]
       #0 WindowToken{2cb42e4 type=2040 android.os.BinderProxy@9c0076} type=undefined mode=fullscreen override-mode=undefined requested-bounds=[0,0][0,0] bounds=[0,0][1440,2960]
        #0 bbfae02 NotificationShade type=undefined mode=fullscreen override-mode=undefined requested-bounds=[0,0][0,0] bounds=[0,0][1440,2960]
    #2 HideDisplayCutout:16:16 type=undefined mode=fullscreen override-mode=undefined requested-bounds=[0,0][0,0] bounds=[0,0][1440,2960]
     #0 OneHanded:16:16 type=undefined mode=fullscreen override-mode=undefined requested-bounds=[0,0][0,0] bounds=[0,0][1440,2960]
      #0 FullscreenMagnification:16:16 type=undefined mode=fullscreen override-mode=undefined requested-bounds=[0,0][0,0] bounds=[0,0][1440,2960]
       #0 Leaf:16:16 type=undefined mode=fullscreen override-mode=undefined requested-bounds=[0,0][0,0] bounds=[0,0][1440,2960]
    #1 OneHanded:15:15 type=undefined mode=fullscreen override-mode=undefined requested-bounds=[0,0][0,0] bounds=[0,0][1440,2960]
     #0 FullscreenMagnification:15:15 type=undefined mode=fullscreen override-mode=undefined requested-bounds=[0,0][0,0] bounds=[0,0][1440,2960]
      #0 Leaf:15:15 type=undefined mode=fullscreen override-mode=undefined requested-bounds=[0,0][0,0] bounds=[0,0][1440,2960]
       #0 WindowToken{36a0a7c type=2000 android.os.BinderProxy@57ea84e} type=undefined mode=fullscreen override-mode=undefined requested-bounds=[0,0][0,0] bounds=[0,0][1440,2960]
        #0 f20fb5a StatusBar type=undefined mode=fullscreen override-mode=undefined requested-bounds=[0,0][0,0] bounds=[0,0][1440,2960]
    #0 HideDisplayCutout:0:14 type=undefined mode=fullscreen override-mode=undefined requested-bounds=[0,0][0,0] bounds=[0,0][1440,2960]
     #0 OneHanded:0:14 type=undefined mode=fullscreen override-mode=undefined requested-bounds=[0,0][0,0] bounds=[0,0][1440,2960]
      #1 ImePlaceholder:13:14 type=undefined mode=fullscreen override-mode=undefined requested-bounds=[0,0][0,0] bounds=[0,0][1440,2960]
       #0 ImeContainer type=undefined mode=fullscreen override-mode=undefined requested-bounds=[0,0][0,0] bounds=[0,0][1440,2960]
        #0 WindowToken{18b2fcb type=2011 android.os.Binder@f3da9a} type=undefined mode=fullscreen override-mode=undefined requested-bounds=[0,0][0,0] bounds=[0,0][1440,2960]
         #0 3a9ce61 InputMethod type=undefined mode=fullscreen override-mode=undefined requested-bounds=[0,0][0,0] bounds=[0,0][1440,2960]
      #0 FullscreenMagnification:0:12 type=undefined mode=fullscreen override-mode=undefined requested-bounds=[0,0][0,0] bounds=[0,0][1440,2960]
       #2 Leaf:3:12 type=undefined mode=fullscreen override-mode=undefined requested-bounds=[0,0][0,0] bounds=[0,0][1440,2960]
        #0 WindowToken{fc9ff07 type=2038 android.os.BinderProxy@d280149} type=undefined mode=fullscreen override-mode=undefined requested-bounds=[0,0][0,0] bounds=[0,0][1440,2960]
         #0 d5c8415 ShellDropTarget type=undefined mode=fullscreen override-mode=undefined requested-bounds=[0,0][0,0] bounds=[0,0][1440,2960]
       #1 DefaultTaskDisplayArea type=undefined mode=fullscreen override-mode=undefined requested-bounds=[0,0][0,0] bounds=[0,0][1440,2960]
        #2 Task=1 type=home mode=fullscreen override-mode=undefined requested-bounds=[0,0][0,0] bounds=[0,0][1440,2960]
         #0 Task=24 type=home mode=fullscreen override-mode=undefined requested-bounds=[0,0][0,0] bounds=[0,0][1440,2960]
          #0 ActivityRecord{7246b16 u0 com.android.launcher3/.uioverrides.QuickstepLauncher} t24} type=home mode=fullscreen override-mode=undefined requested-bounds=[0,0][0,0] bounds=[0,0][1440,2960]
           #0 bd08f5d com.android.launcher3/com.android.launcher3.uioverrides.QuickstepLauncher type=home mode=fullscreen override-mode=undefined requested-bounds=[0,0][0,0] bounds=[0,0][1440,2960]
        #1 Task=3 type=undefined mode=fullscreen override-mode=fullscreen requested-bounds=[0,0][0,0] bounds=[0,0][1440,2960]
        #0 Task=4 type=undefined mode=fullscreen override-mode=fullscreen requested-bounds=[0,0][0,0] bounds=[0,0][1440,2960]
         #1 Task=6 type=undefined mode=multi-window override-mode=multi-window requested-bounds=[0,0][0,0] bounds=[0,0][1440,2960]
         #0 Task=5 type=undefined mode=multi-window override-mode=multi-window requested-bounds=[0,0][0,0] bounds=[0,0][1440,2960]
       #0 Leaf:0:1 type=undefined mode=fullscreen override-mode=undefined requested-bounds=[0,0][0,0] bounds=[0,0][1440,2960]
        #0 WallpaperWindowToken{a0c14b1 token=android.os.Binder@c234b58} type=undefined mode=fullscreen override-mode=fullscreen requested-bounds=[0,0][0,0] bounds=[0,0][1440,2960]
         #0 b9a90a8 com.android.systemui.ImageWallpaper type=undefined mode=fullscreen override-mode=undefined requested-bounds=[0,0][0,0] bounds=[0,0][1440,2960]
可以看出,层级机构树一共有37层,层级越高,越接近我们的"眼睛",以上父子关系,做成图表格式,可以看的更直观,如下:

2,层级结构树的构建过程
SystemServer启动时,调用startOtherServices方法
private void startOtherServices(@NonNull TimingsTraceAndSlog t) {
	//省略
		t.traceBegin("SetWindowManagerService");
   	 	mActivityManagerService.setWindowManager(wm);
        t.traceEnd();
        //省略
}
AMS.setWindowManager
 public void setWindowManager(WindowManagerService wm) {
        synchronized (this) {
            mWindowManager = wm;
            mWmInternal = LocalServices.getService(WindowManagerInternal.class);
            mActivityTaskManager.setWindowManager(wm);
        }
    }
ATMS.setWindowManager
public void setWindowManager(WindowManagerService wm) {
        synchronized (mGlobalLock) {
           //省略
            mRootWindowContainer.setWindowManager(wm);
            //省略
        }
    }
RootWindowContainer.setWindowManager
void setWindowManager(WindowManagerService wm) {
       //省略
        final Display[] displays = mDisplayManager.getDisplays();//得到系统有几个显示设备
        for (int displayNdx = 0; displayNdx < displays.length; ++displayNdx) {//遍历display
            final Display display = displays[displayNdx];
            final DisplayContent displayContent = new DisplayContent(display, this);//创建DisplayContent
            addChild(displayContent, POSITION_BOTTOM);//将DisplayContent挂在root下
            if (displayContent.mDisplayId == DEFAULT_DISPLAY) {
                mDefaultDisplay = displayContent;
            }
        }
		//省略
    }
对于每个显示设备,系统都会创建一个DisplayContent对象,并将DisplayContent对象挂在root下。接着来看一下DisplayContent的创建
DisplayContent(Display display, RootWindowContainer root) {
	//省略
	configureSurfaces(pendingTransaction);
	//省略
}
configureSurfaces
 private void configureSurfaces(Transaction transaction) {
        final SurfaceControl.Builder b = mWmService.makeSurfaceBuilder(mSession)
                .setOpaque(true)
                .setContainerLayer()
                .setCallsite("DisplayContent");
        mSurfaceControl = b.setName(getName()).setContainerLayer().build();

        if (mDisplayAreaPolicy == null) {
            // Setup the policy and build the display area hierarchy.
            // Build the hierarchy only after creating the surface so it is reparented correctly
            mDisplayAreaPolicy = mWmService.getDisplayAreaPolicyProvider().instantiate(
                    mWmService, this /* content */, this /* root */,
                    mImeWindowsContainer);
        }

 		//省略
getDisplayAreaPolicyProvider得到的是DefaultProvider对象,然后调用其instantiate方法。源码路径:frameworks/base/services/core/java/com/android/server/wm/DisplayAreaPolicy.java
static final class DefaultProvider implements DisplayAreaPolicy.Provider {
        @Override
        public DisplayAreaPolicy instantiate(WindowManagerService wmService,
                DisplayContent content, RootDisplayArea root,
                DisplayArea.Tokens imeContainer) {
            final TaskDisplayArea defaultTaskDisplayArea = new TaskDisplayArea(content, wmService,
                    "DefaultTaskDisplayArea", FEATURE_DEFAULT_TASK_CONTAINER);//创建DefaultTaskDisplayArea
            final List<TaskDisplayArea> tdaList = new ArrayList<>();
            tdaList.add(defaultTaskDisplayArea);

            // Define the features that will be supported under the root of the whole logical
            // display. The policy will build the DisplayArea hierarchy based on this.
            final HierarchyBuilder rootHierarchy = new HierarchyBuilder(root);
            // Set the essential containers (even if the display doesn't support IME).
            rootHierarchy.setImeContainer(imeContainer).setTaskDisplayAreas(tdaList);//1
            if (content.isTrusted()) {
                // Only trusted display can have system decorations.
                configureTrustedHierarchyBuilder(rootHierarchy, wmService, content);//2
            }

            // Instantiate the policy with the hierarchy defined above. This will create and attach
            // all the necessary DisplayAreas to the root.
            return new DisplayAreaPolicyBuilder().setRootHierarchy(rootHierarchy).build(wmService);//3
        }
首先创建HierarchyBuilder对象,注释1处将imeContainer和tdaList(tdaList此时只有一个元素就是DefaultTaskDisplayArea)分别保存在HierarchyBuilder对象中的mImeContainer和mTaskDisplayAreas中。注释2处创建Feature并设置Feature的层级。注释3处开始构建层级树
2.1,创建Feature
configureTrustedHierarchyBuilder
//frameworks/base/services/core/java/com/android/server/wm/DisplayAreaPolicy.java
private void configureTrustedHierarchyBuilder(HierarchyBuilder rootHierarchy,
                WindowManagerService wmService, DisplayContent content) {
            // WindowedMagnification should be on the top so that there is only one surface
            // to be magnified.
            rootHierarchy.addFeature(new Feature.Builder(wmService.mPolicy, "WindowedMagnification",
                    FEATURE_WINDOWED_MAGNIFICATION)
                    .upTo(TYPE_ACCESSIBILITY_MAGNIFICATION_OVERLAY)
                    .except(TYPE_ACCESSIBILITY_MAGNIFICATION_OVERLAY)
                    // Make the DA dimmable so that the magnify window also mirrors the dim layer.
                    .setNewDisplayAreaSupplier(DisplayArea.Dimmable::new)
                    .build());
            if (content.isDefaultDisplay) {
                // Only default display can have cutout.
                // See LocalDisplayAdapter.LocalDisplayDevice#getDisplayDeviceInfoLocked.
                rootHierarchy.addFeature(new Feature.Builder(wmService.mPolicy, "HideDisplayCutout",
                        FEATURE_HIDE_DISPLAY_CUTOUT)
                        .all()
                        .except(TYPE_NAVIGATION_BAR, TYPE_NAVIGATION_BAR_PANEL, TYPE_STATUS_BAR,
                                TYPE_NOTIFICATION_SHADE)
                        .build())
                        .addFeature(new Feature.Builder(wmService.mPolicy, "OneHanded",
                                FEATURE_ONE_HANDED)
                                .all()
                                .except(TYPE_NAVIGATION_BAR, TYPE_NAVIGATION_BAR_PANEL,
                                        TYPE_SECURE_SYSTEM_OVERLAY)
                                .build());
            }
            rootHierarchy
                    .addFeature(new Feature.Builder(wmService.mPolicy, "FullscreenMagnification",
                            FEATURE_FULLSCREEN_MAGNIFICATION)
                            .all()
                            .except(TYPE_ACCESSIBILITY_MAGNIFICATION_OVERLAY, TYPE_INPUT_METHOD,
                                    TYPE_INPUT_METHOD_DIALOG, TYPE_MAGNIFICATION_OVERLAY,
                                    TYPE_NAVIGATION_BAR, TYPE_NAVIGATION_BAR_PANEL)
                            .build())
                    .addFeature(new Feature.Builder(wmService.mPolicy, "ImePlaceholder",
                            FEATURE_IME_PLACEHOLDER)
                            .and(TYPE_INPUT_METHOD, TYPE_INPUT_METHOD_DIALOG)
                            .build());
        }
    }
可以看出,这里创建了几个Feature,以及它们对应的层级是:
- WindowedMagnification:0~31
- HideDisplayCutout: 0~ 14 16 18~ 23 26~35
- OneHanded:0~ 23 26~ 32 34~35
- FullscreenMagnification:0~ 12 15~ 23 26~ 27 29~ 31 33~35
- ImePlaceholder:13 14
至于层级是怎么得出来的,具体查看Feature.Builder的 all,except等等方法。Feature以及对应的层级设置好之后,接下来就是要开始构建层级树了。
2.2, 层级树的构建
源码路径:frameworks/base/services/core/java/com/android/server/wm/DisplayAreaPolicyBuilder.java
Result build(WindowManagerService wmService) {
        validate();

        // Attach DA group roots to screen hierarchy before adding windows to group hierarchies.
        mRootHierarchyBuilder.build(mDisplayAreaGroupHierarchyBuilders);
       //省略
    }
mRootHierarchyBuilder就是之前创建的HierarchyBuilder对象,调用其build方法。构建层级树的核心就是该方法,来分步分析它
2.2.1 挂载 Feature
private void build(@Nullable List<HierarchyBuilder> displayAreaGroupHierarchyBuilders) {
            final WindowManagerPolicy policy = mRoot.mWmService.mPolicy;
            final int maxWindowLayerCount = policy.getMaxWindowLayer() + 1;// 37
            final DisplayArea.Tokens[] displayAreaForLayer =
                    new DisplayArea.Tokens[maxWindowLayerCount];
            final Map<Feature, List<DisplayArea<WindowContainer>>> featureAreas =
                    new ArrayMap<>(mFeatures.size());//前面创建了5个Feature,所以size为5
            for (int i = 0; i < mFeatures.size(); i++) {
                featureAreas.put(mFeatures.get(i), new ArrayList<>());
            }


            PendingArea[] areaForLayer = new PendingArea[maxWindowLayerCount];
            final PendingArea root = new PendingArea(null, 0, null);
            Arrays.fill(areaForLayer, root);//此时里面的每个元素都是root 0,0

            // Create DisplayAreas to cover all defined features.
            final int size = mFeatures.size();
            for (int i = 0; i < size; i++) {

                final Feature feature = mFeatures.get(i);
                PendingArea featureArea = null;
                for (int layer = 0; layer < maxWindowLayerCount; layer++) {
                    if (feature.mWindowLayers[layer]) {

                        if (featureArea == null || featureArea.mParent != areaForLayer[layer]) {
                            // No suitable DisplayArea:
                            // Create a new one under the previous area (as parent) for this layer.
                            featureArea = new PendingArea(feature, layer, areaForLayer[layer]);
                            areaForLayer[layer].mChildren.add(featureArea);
                        }
                        areaForLayer[layer] = featureArea;
                    } else {

                        featureArea = null;
                    }
                }
            }
创建一个临时的层级结构树PendingArea(后面还需要转换成真正的层级树的),对于Feature,其构造结果如下

2.2.2,挂载leaf叶子结点
private void build(@Nullable List<HierarchyBuilder> displayAreaGroupHierarchyBuilders) {
	//省略
	 // Create Tokens as leaf for every layer.
            PendingArea leafArea = null;
            int leafType = LEAF_TYPE_TOKENS;
            for (int layer = 0; layer < maxWindowLayerCount; layer++) {
                int type = typeOfLayer(policy, layer);
                // Check whether we can reuse the same Tokens with the previous layer. This happens
                // if the previous layer is the same type as the current layer AND there is no
                // feature that applies to only one of them.
                if (leafArea == null || leafArea.mParent != areaForLayer[layer]
                        || type != leafType) {
                    // Create a new Tokens for this layer.
                    leafArea = new PendingArea(null /* feature */, layer, areaForLayer[layer]);
                    areaForLayer[layer].mChildren.add(leafArea);
                    leafType = type;
                    if (leafType == LEAF_TYPE_TASK_CONTAINERS) {
                        // We use the passed in TaskDisplayAreas for task container type of layer.
                        // Skip creating Tokens even if there is no TDA.
                        addTaskDisplayAreasToApplicationLayer(areaForLayer[layer]);
                        addDisplayAreaGroupsToApplicationLayer(areaForLayer[layer],
                                displayAreaGroupHierarchyBuilders);
                        leafArea.mSkipTokens = true;
                    } else if (leafType == LEAF_TYPE_IME_CONTAINERS) {
                        // We use the passed in ImeContainer for ime container type of layer.
                        // Skip creating Tokens even if there is no ime container.
                        leafArea.mExisting = mImeContainer;
                        leafArea.mSkipTokens = true;
                    }
                }
                leafArea.mMaxLayer = layer;
            }
}
首先也是创建临时的叶子PendingArea,leafType默认为LEAF_TYPE_TOKENS,在typeOfLayer方法中,对于IME和Application 有处理,将其leafType设为LEAF_TYPE_TASK_CONTAINERS和LEAF_TYPE_IME_CONTAINERS。注意对于这两种类型,有特殊的处理,mSkipTokens设置为了true,后续将临时的结构树转成真正的层级树的时候有用。
经过这一步,此时结构树的构造结果如下

2.2.3 将临时的结构树转成真正的结构树
在build方法的最后,调用instantiateChildren方法,进行结构树的转换
void instantiateChildren(DisplayArea<DisplayArea> parent, DisplayArea.Tokens[] areaForLayer,
                int level, Map<Feature, List<DisplayArea<WindowContainer>>> areas) {
            mChildren.sort(Comparator.comparingInt(pendingArea -> pendingArea.mMinLayer));
            for (int i = 0; i < mChildren.size(); i++) {
                final PendingArea child = mChildren.get(i);
                final DisplayArea area = child.createArea(parent, areaForLayer);//转换
                if (area == null) {
                    // TaskDisplayArea and ImeContainer can be set at different hierarchy, so it can
                    // be null.
                    continue;
                }
                parent.addChild(area, WindowContainer.POSITION_TOP);
                if (child.mFeature != null) {
                    areas.get(child.mFeature).add(area);
                }
                child.instantiateChildren(area, areaForLayer, level + 1, areas);//迭代的过程
            }
        }
在createArea中,对于IME和Application Layer是有特殊处理的,删掉上面对应结点下的leaf叶子,最终转换好的结构树如下